

How To Make A Simple Game With Unity: Beginners Guide (Part 2)
Game Over, Level Complete, and more!

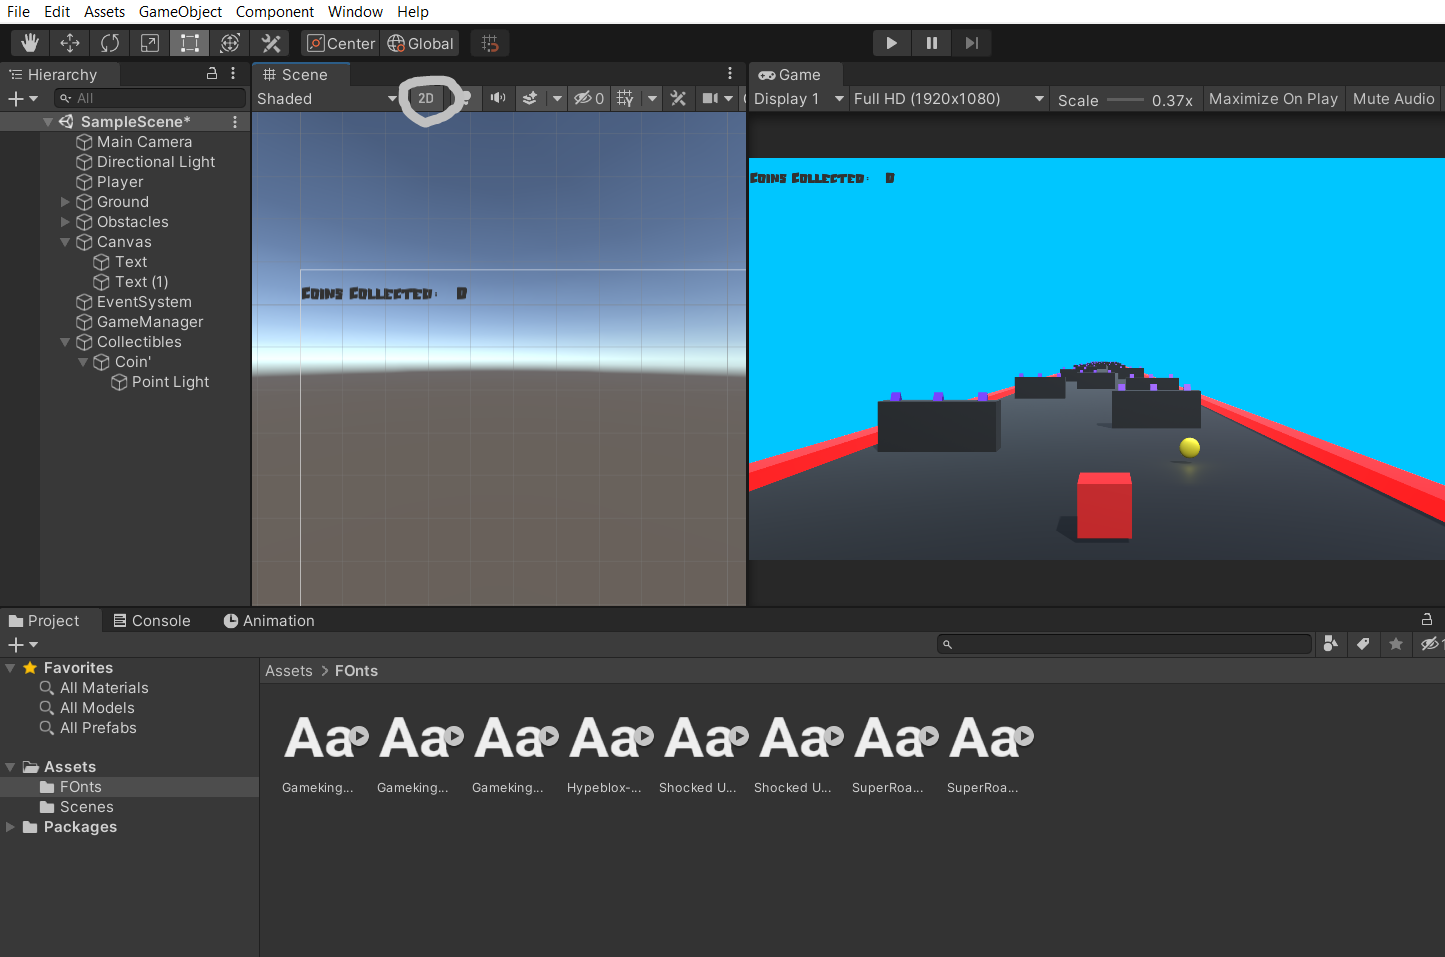
👋 Hello, World! In the previous article, we created some basic things for our game and now, it may look something like this:
Watch the video here
Now we have to make the Game Over part.
Game Over
In this game, Game Over is done when the Player collides on an obstacle that we made. Also, if the player falls down, the same thing can happen (If you don't have bars or any other barrier that stops the Player from falling down).
Create 2 Scripts— GameOver and GameManager. Game Manager is often used to create functions like Level Complete, Game Over etc. Usually, it will be shown as a gear icon⚙
Go to GameManager script and write the below code.
using System.Collections;
using System.Collections.Generic;
using UnityEngine;
using UnityEngine.SceneManagement; //When using Scenes

public class GameManager : MonoBehaviour
{
    bool gamehasEnded = true;
    public void GameOver()

    {

        if (gamehasEnded == true)

        {
            gamehasEnded = true;

            Restart();
            void Restart()
            {
                SceneManager.LoadScene(SceneManager.GetActiveScene().name);
            }

        }
    }
}
In this code, you see that we have used a new Namespace: using UnityEngine.SceneManagement; This namespace is used when we have something to do with scenes(commonly levels).
- Thereafter, we create some public variables, a bool, and a Game Object.
gamehasEndedhas many purposes, here we use it to denote whether the current game session is over to not. - Then we create the
GameOver()function and it is called only ifgamehasEnded = true;. This means when the game is over. - So what happens when the game is over, the Panel activates and the
Restart()function is called. Here is where we deal with Scenes. It directly gets the Active Scene's name and loads it.
Everything's great, but how do we call this? We call it from the GameOver script.
Game Over when Collided with an Obstacle
 private void OnCollisionEnter(Collision collisionInfo)


    {
        if (collisionInfo.collider.tag == "obstacle")
        {

            FindObjectOfType<PlayerMovement>().enabled = false;
            FindObjectOfType<GameManager>().GameOver();
        }
    }
This one is pretty simple. OnCollisionEnter is a built-in function that is used when an Object collides somewhere.
- We use an if condition to identify whether the object that the Player collided with has the tag called "obstacle". (We did this before making the obstacle, go back and revise)
- If yes, we disable the Player Movement and call the function that we wrote in Game Manager. That's it!
Game Over when Player falls down
This is done in PlayerMovement script.
 if (Rb.position.y < 0.1f) //use your Player's position.

        {
            FindObjectOfType<GameManeger>().GameOver();

        }
This is really obvious, don't think I should explain it 😇
Now save all the scripts and go to the Editor. Create an empty GameObject (You know the way, "Create Empty") and the name is as GameManager. Then Drag and drop the Game Manager script.
When the game is over, the game will be automatically restarted. If there's a color change when restarted, ignore it. It will be fine on the build, it's just an editor issue.
Collectibles
Collectibles are one of the main things that can attract the Player. Here I use simple balls or spheres as collectibles(Player may think they're golden balls, eggs, or anything. Their choice!). You can use anything you want.
See the video for animation and other things here
In the above video, I create a coin with an animation. On that coin, there's a component called "Sphere Collider". In it, there's a checkbox called Is Trigger. Make it True so our Player can go through it without colliding.
Then we have to make a text that indicated the number of coins that the Player collected. Go to hierarchy > right-click > UI > Text. (A canvas and the event system will be created, don't change or delete them.) Write "Coins Collected:" on the Textbox and create another text with 0. It will be the Text that we'll use in the script and it is frequently updated.
Tips:
- Click on the 2D button in the scene window's toolbar for a better experience when creating UI.
- To import fonts, just drag and drop downloaded fonts. 1001fonts.com is a great place, that I personally use.
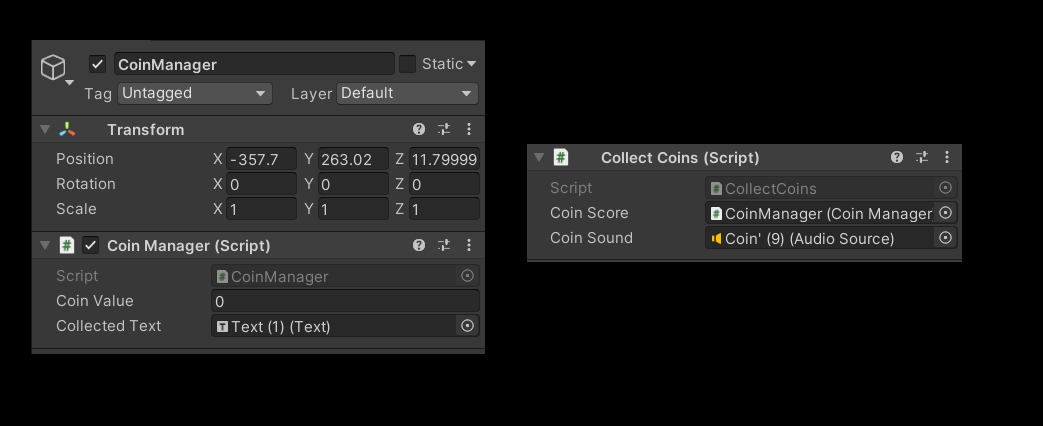
We will need two scripts for collectibles— CollectCoins and CoinManager. CoinManager is to keep the number of coins collected and CollectCoins is to collect coins. It does 3 things:
- Adding value to the variable in
CoinManager. - Destroying the coin after picking up.
- Playing sound when a coin is collected.
So fist, we have to write the CoinManager as below:
using UnityEngine.UI;

public class CoinScore : MonoBehaviour
{
    public float coinValue;
    public Text collectedText;

    public void Update()
    {
                collectedText.text = Mathf.RoundToInt(coinValue).ToString();

    }

}
These few lines do an important job.
Here, we are using another new namespace—
using UnityEngine.UI;. It is essential when we have to deal with UI objects like Text, Panel, Canvas, etc.We have two variables for coin value and Text that displays the number of coins collected.
In
Update(), we update the Text by making it equal to the amount of coins collected.
Done, now we have to write another script. Create a new script called "CollectCoins" and write down the below code.
 public CoinScore coinScore;

    public AudioSource coinSound;

    private void OnTriggerEnter(Collider other)
    {
        if (other.CompareTag("Player"))
        {

            coinScore.coinValue += 1;
            Debug.Log("Score Added!");
            PlaySound();
            Destroy(this.gameObject);

        }

    }

    private void PlaySound()
    {
        coinSound.Play();
    }
- Then we make 2 public variables for our
CoinManagerscript and an Audio Source to be played when the Player collects one. For this, download coin notification.mp3 here When we have created a variable for another script in our project, we can use its variables, functions, and everything in here.
After that, we use the built-in function
OnTriggerEnter. Same as OnCOlliderEnter, this function is called when a GameObject is entered into a trigger. Here, the coin is the trigger.We use "Player" tag which is on Player (Add it if you haven't) in our If condition and if it is, +1 is added to
coinValuevariable onCoinManager.
Debug.Log is often used by developers in testing. The game has no effect on it. Debug.log appears on the Console window. So we get to see a Text saying "Score added!" in the console window once a coin is collected.
Finally, we call the
PlaySound()function, which we have written in the other line.
Save the scripts, go to Editor, and add the "CollectCoins" script to the Coin you have created. Import the coin sound and drag-drop it too to the coin. Thereafter, you will see an Audio Source component is there in Inspector. Drag and drop the Audio Source component to "coinSound" component.
Make a new empty object called "CoinManager" or anything you want. Add our CoinManager to that object. Add text to "collectText" slot and keep that coin value unchanged. Now you can drag and drop the CoinManager object to the slot in "collectCoins" script. Now they should look like this:
Hit "Play" and collect the coin. 3 things will happen:
- Coin will be disappeared due to
Destroy(gameObject); - Coin sound will be played.
- "0" will be "1" in the Text.
If all these are working, duplicate the coins and add them in various places.
Now we have to make the...
Level Complete 🏁
We're almost finished, now we have the Level Complete part. Make a cuboid that fits ground in breadth.
Don't worry about its look, it's an invisible trigger.
So this is the level complete trigger. So once the Player is entered, the level is complete, a panel with a button showed up so the player can go to the next level. To make this invisible, remove the "Mesh Renderer" component in Inspector, and to make this a trigger, check the "Is Trigger" box in Box collider.
Great, now what?
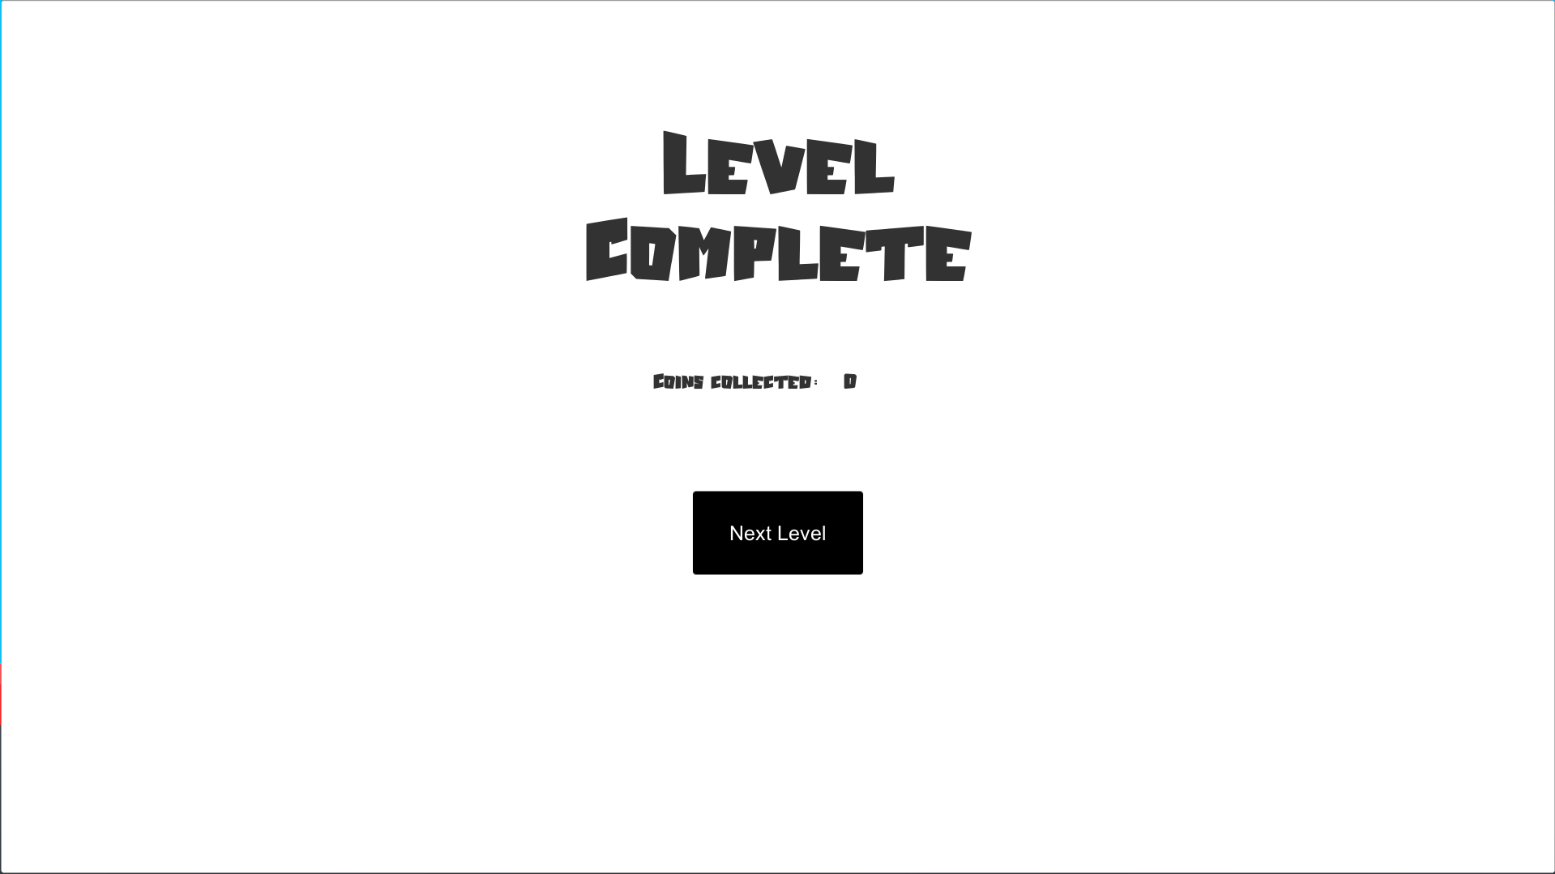
Before writing the script, let's create a Panel. To do, go to hierechy > right-click > UI > Panel. A white color, the translucent panel will be there. Now all you have is to change the color and transparency as you want.
- In the same way, create a Text, "Level Complete!"(You know the way, right?)
- Under that, create 2 text objects. One for "Coin Collected:" text and the other for the number of coins collected.
- Create a button in the same way too. Adjust the size, color, and Text (The text would be Next Level)
It may look something like this:
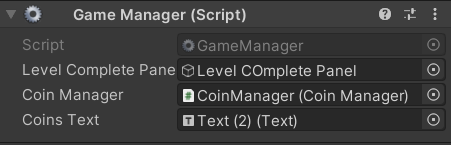
 All done, got to GameManager script and add following function.
public GameObject LevelCompletePanel;
public CoinManager coinManager;
public Text CoinsText;

 public void LevelComplete()

    {
        LevelCompletePanel.SetActive(true);
        CoinsText.text = Mathf.RoundToInt(coinManager.coinValue).ToString();
    }
We create 3 variables here too. One is for our CoinManager script, Level COmplete Panel, and the other one is for "Collected Coins" text.
- From the function, we activate the Level COmplete Panel first
- And in the second line, we make COllected Coins text as the
coinValuevariable of Game Manager.
Great, create a new script "TriggerEnter".
  public GameObject Player;
  private void OnTriggerEnter(Collider other)

    {

        if (other.tag == "Player")
        {
            FindObjectOfType<GameManager>().LevelComplete();
            Player.SetActive(false);
            SceneManager.LoadScene(SceneManager.GetActiveScene().buildIndex + 1);//Load Next Level in Build Setting.


        }

    }
This one is simple too. Be sure to use SceneManagement namespace here as well.
- We use the
OnTriggerEnterscript on here as well. And if conditions makes sure that its Player who is entering the trigger. - Then we call
LevelComplete()in GameManager. - In next line, deactivate the Player so it doesn't fall or move.
Save the script, and attach the script to the Trigger we made. Everything should work well once you've attached the Player object to the script. And in GameManager too, attach the objects.
Cool, but now we need our button to work. We need to create a function in GameManager to do this.
 public void NextLevel()
    {
        SceneManager.LoadScene(SceneManager.GetActiveScene().buildIndex + 1);
    }
Here we just load the next scene with the help of the Scene Manager.
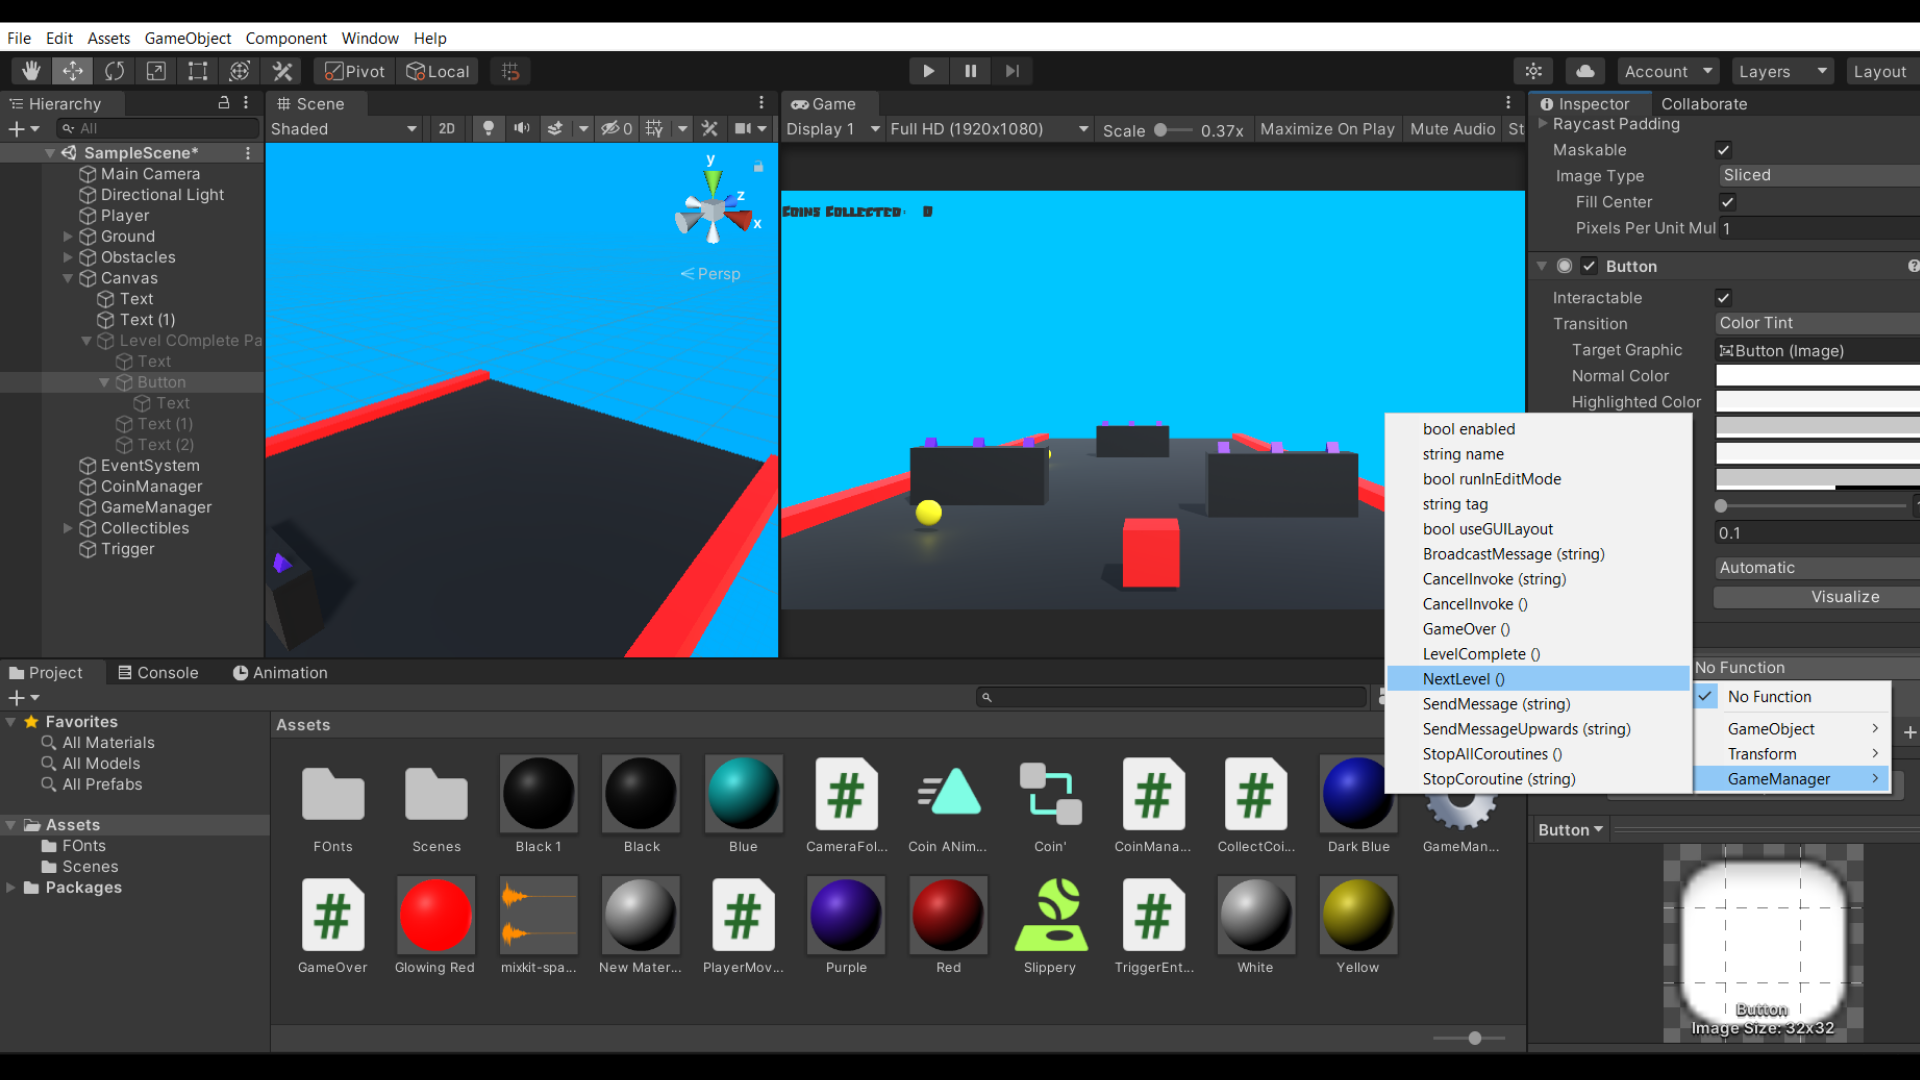
Save the script and go to the Editor. On the button, you will see a "Button" component. In beneath, there is an area called OnClick(). Click on the Plus icon.
Drag and drop the GameManager game object to the slot.
- In dropdown, select GameManager > NextLevel()
Now everything should work! Well, the button is clickable, but it doesn't do anything because you don't have the next level. No, no, we don't make it from scratch. In the project tab, there's an automatically created folder called Scenes. There should be a scene named "SampleScene".
- Rename it as "Level 01".
- Select it and press Ctrl + D. Scene is duplicated!
Automatically renamed...🙌
Well, every level shouldn't be the same. So you have some work to do until the last part of this series is published.
Design the other levels!
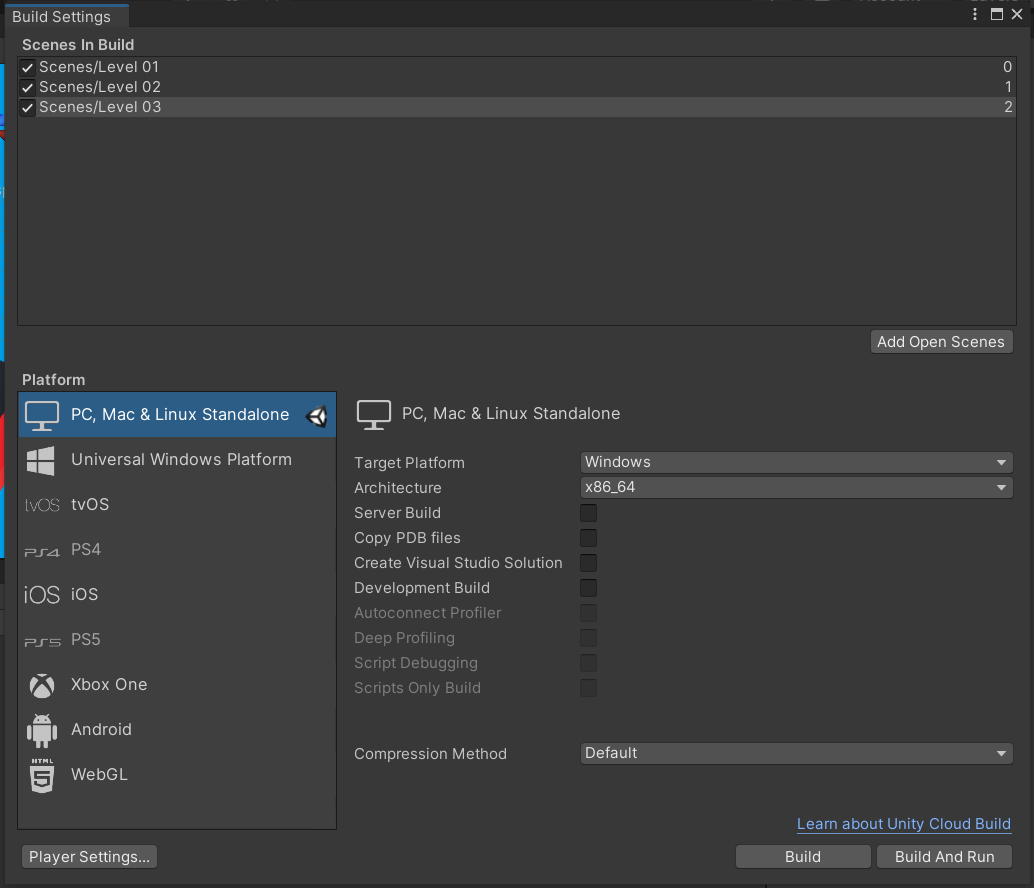
After you've done, go to File > Build Settings. In the area called "Scenes in build", drag and drop the levels you've built in the right order.
Stay tuned for the last part!
Only a few more changes to be done, so I can say we're almost finished! See you in Part 03 of the series ✌

References
- Download fonts: 1001fonts.com
- Coin sound: https://mp3download.to/10en/_2YRwp4QF0E.html


